This tutorial will walk you through the steps that I take to create vector portraits using Photoshop to prepare a source/guide image and Illustrator to draw the final artwork.
Tools used:
- drawing tablet (I use a Wacom Bamboo)
- Adobe Photoshop
- Adobe Illustrator
Before You Begin
I learned most of my vector portrait process by viewing Aldo Figueroa’s excellent three-part “Illustrator Vector Portrait Tutorial” YouTube video. The video takes about an hour to watch, but offers visual demonstrations of drawing with the pen and pencil tools and shows how to perform the Pathfinder > Intersect operation that is used to create smooth transitions where shapes overlap other shapes.
Illustrator Vector Portrait Tutorial – Part 1
Illustrator Vector Portrait Tutorial – Part 2
Illustrator Vector Portrait Tutorial – Part 3
Step-by-Step Vector Portrait
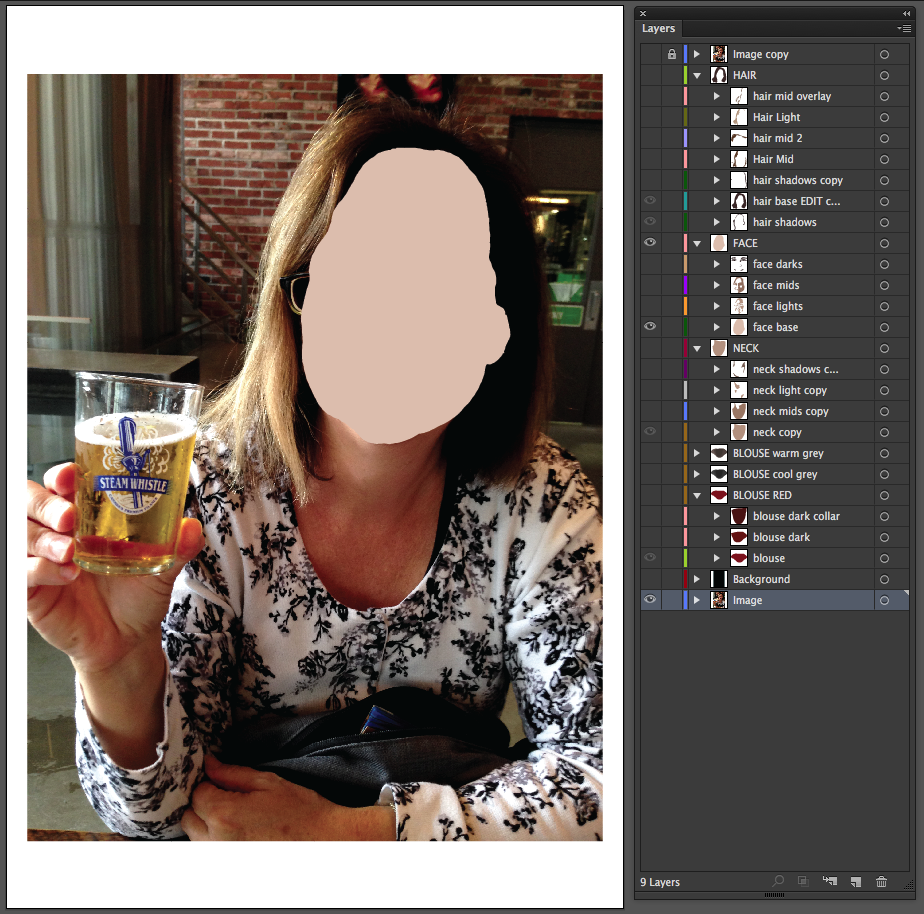
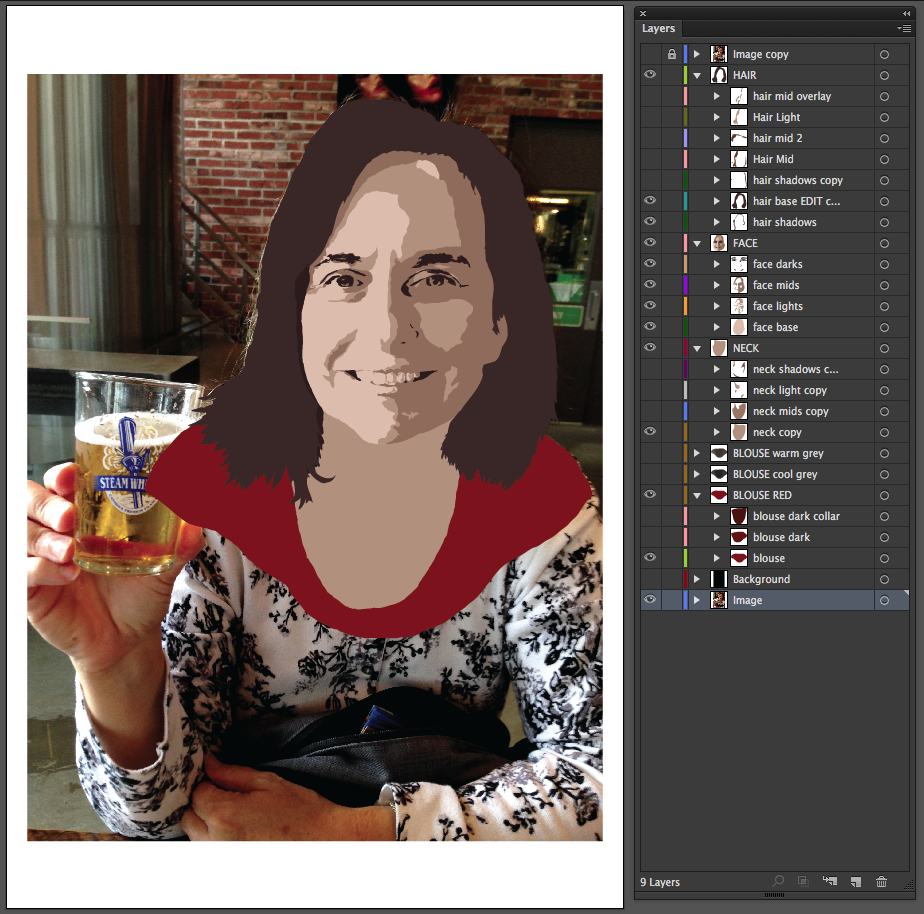
Step 1 – Create a Photoshop source image and place it into Adobe Illustrator
In Photoshop…
Save your source image as a Photoshop file (.psd), so that brightness/contrast adjustments can later be applied to reveal different levels of contrast in the image.
In Illustrator…
File > Place the photo reference image (.psd). Select the “Link” check box. This will allow any updates to the image to be reflected in your Illustrator document.

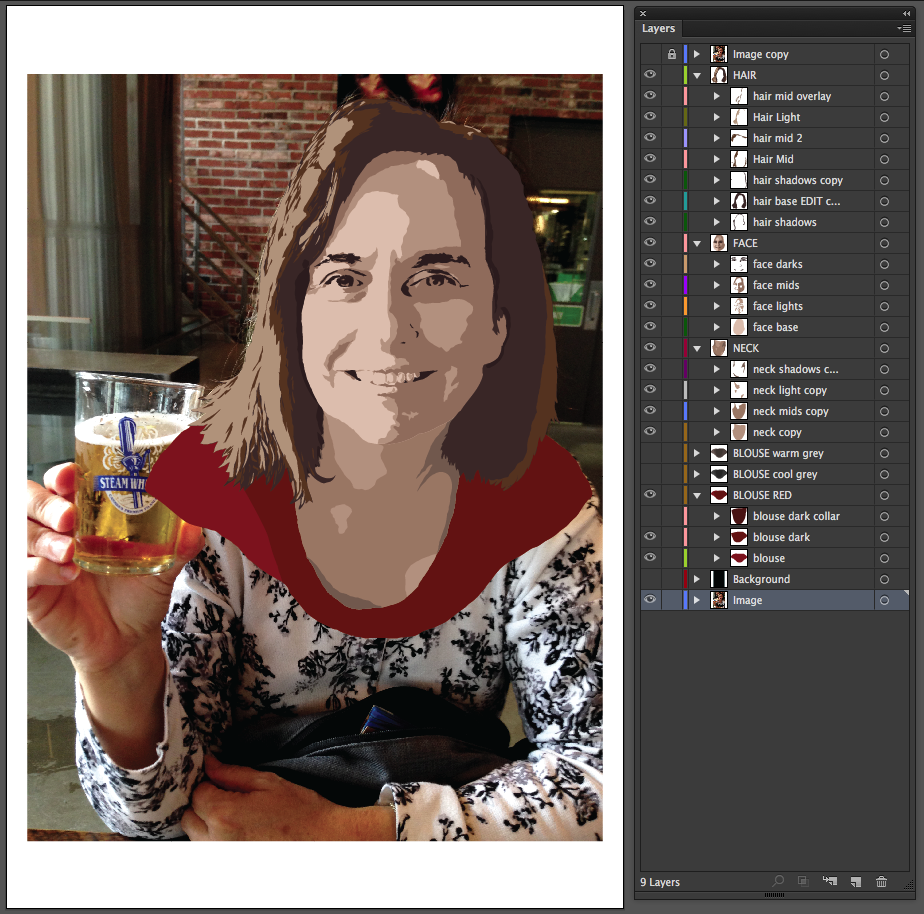
I selected this photo because I liked the lighting contrast and the expression on my wife’s face. I didn’t want to include her hand holding the glass, but as you’ll see I cropped and focused on my wife’s face for this portrait. Also, I choose to exclude the eyeglasses that she was wearing in the source image.
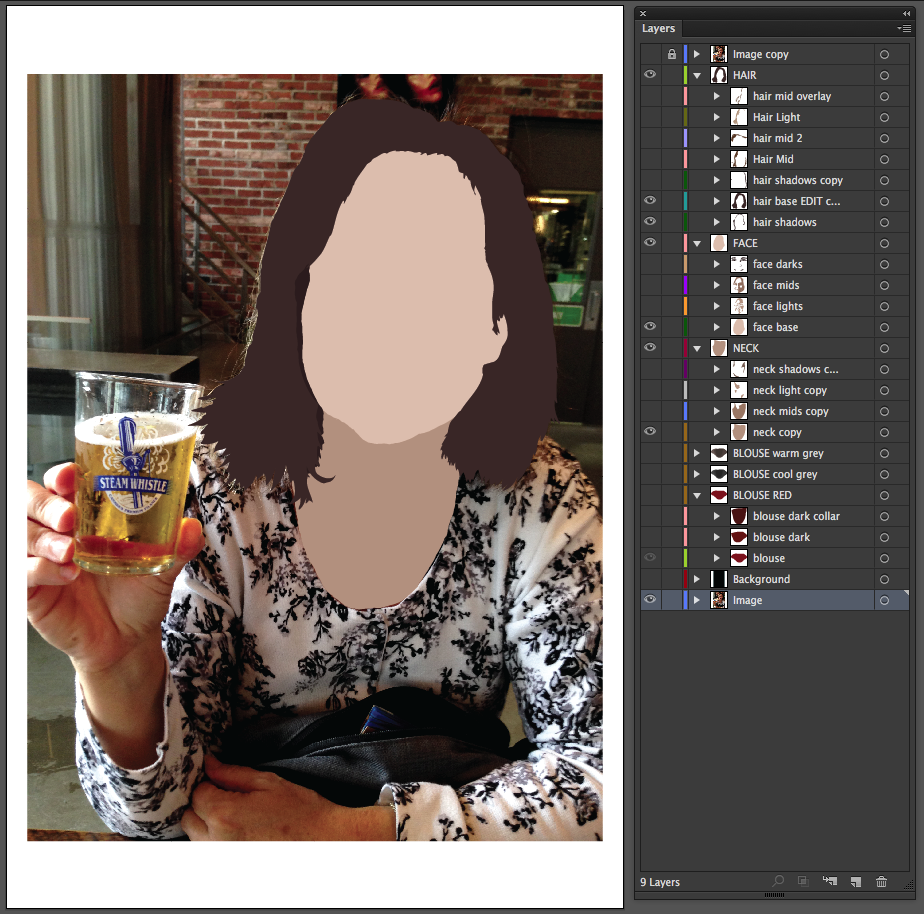
Step 2 – Draw the “base” shape of the face (20% black)
Create a new layer above the reference image.
Using the Pen and Pencil tools (set to no fill and color stroke), outline the face “base” with a light brown, light gray, or other neutral color. The pen tool is useful for drawing long smooth arcing lines. In this example, the pen tool was used to draw the forehead, nose, cheek and jaw. The screenshots show the final colors that were used. During actual drawing I used colors from the default “Grays” swatches that Illustrator provides when you create a new document. For this face “base” I used a 20% black (the third swatch from the right in the “Grays” swatches) as the lightest part of the face. All other colors applied to the face (highlights, mids, darks) were darker than this base color.
To more clearly see the results of your outlines, use Shift-X to switch the stroke color and fill color. Your silhouette should now be filled with whatever color you were using to outline the face.
Step 3 – Adjust the brightness and/or contrast of the Photoshop source image
Moving on to the hair. Applying an adjustment to the Photoshop photo reference file will help bring out details and contrast in the hair. Open (or return to) the photo reference Photoshop file.
- Apply a brightness/contrast adjustment: Image > Adjustment > Brightness/Contrast
- Click the “Use Legacy” check box.
- Increase the brightness and contrast until you can clearly make out the outline of the hair. Save the file and keep it open (since you’ll return to it again, later).
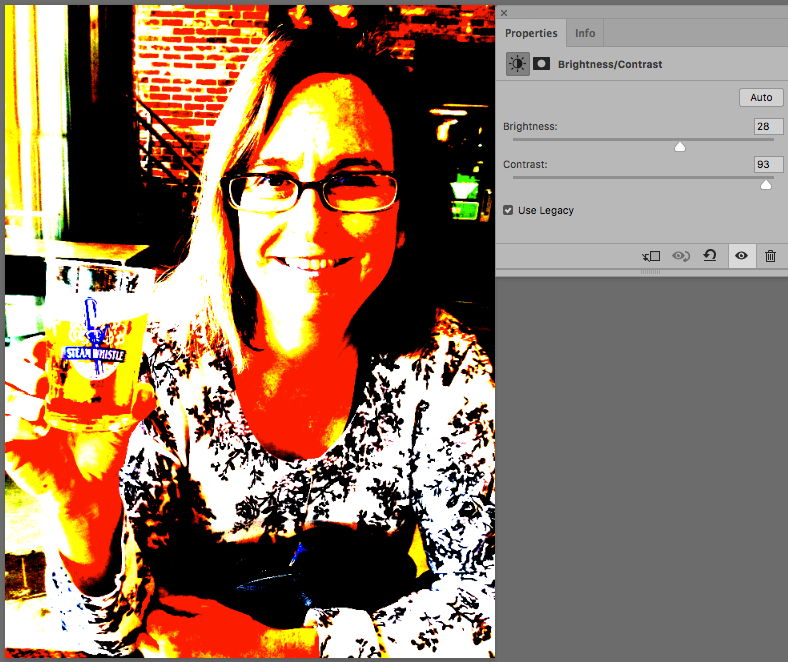
Return to the Illustrator file and you’ll see a notification that your linked file has been modified. Click “Yes” to accept the changes. The adjustments to the photo reference will appear in the Illustrator file. (NOTE: the remaining Illustrator screenshots don’t accurately reflect the red and yellow legacy contrast effects, because I unlinked the Photoshop source image before taking the screenshots. Sorry, my bad!)
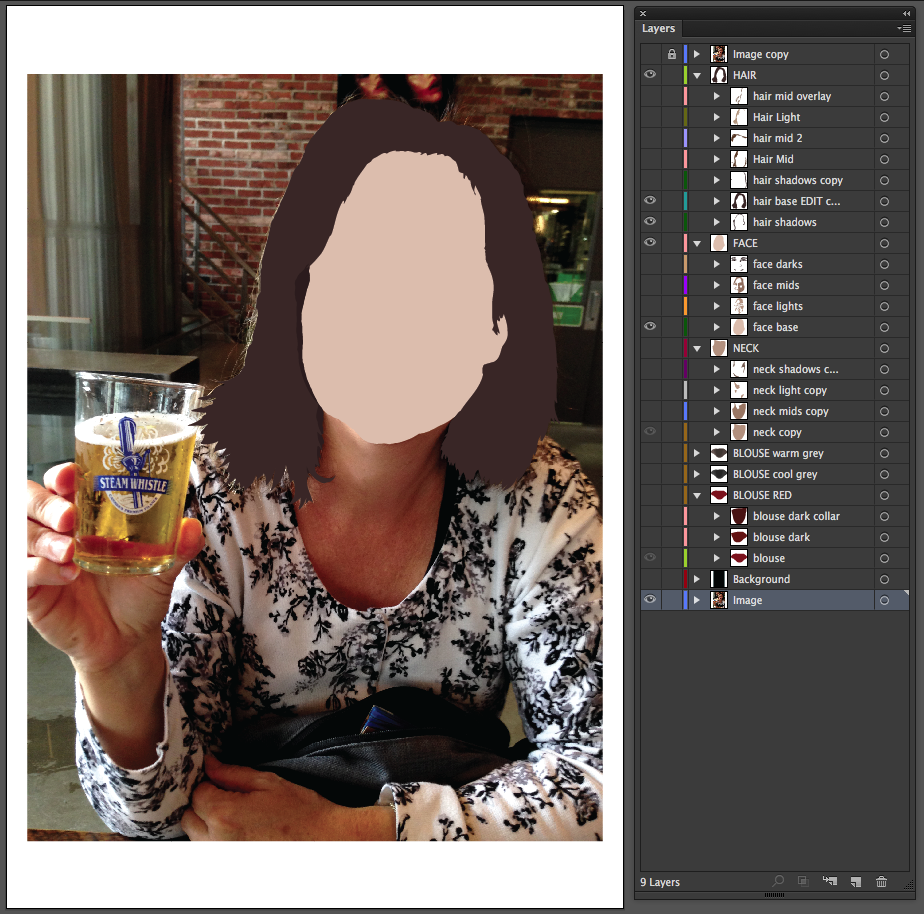
Step 4 – Draw the base shape of the hair (80% black)
Create a new layer above the face base.
Using the Pen and Pencil tools (no fill, color stroke), outline the hair “base” with a dark brown, dark gray, or other neutral color. For the hair “base” I used a 80% black (the third swatch from the left in the default “Grays” swatches). With the exception of some hair shadows applied at the end, the other hair colors (lights and mids) were lighter than this base hair color.
Use Shift-X to switch the stroke color and fill color.
The hair has a mixture of smooth and rough/detailed areas. For the smooth areas, you can continue to use the pen tool. For the detailed areas, the pencil tool may work better.
Here are the pencil tool options that I used…
– keep select
– edit selected paths
With “edit selected paths” enabled, you can define how close your mouse/stylus needs to be to each path point in order to continue editing the selected path. Any gaps between segments can be joined later using Cmd-J (Join). I prefer to join as many paths as possible as I draw, which is why I enabled the “edit selected paths” option. Some people prefer to not use “edit selected paths.” Choose whichever option works best for you.
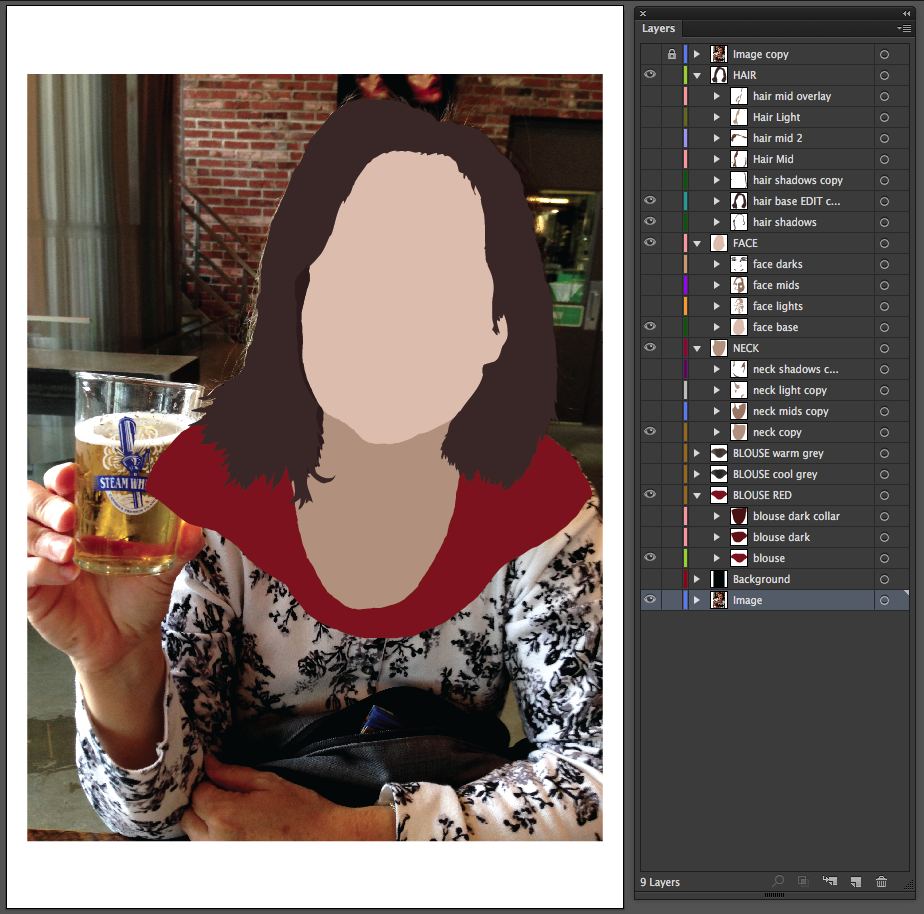
Step 5 – Draw the base shape of the neck (30% black)
Create a new layer below the hair base and face base layers.
Using the Pen and Pencil tools (no fill, color stroke), outline the neck and area where the chest meets the blouse. For this neck “base” I used a 30% black (fourth swatch from the left), so that it would contrast with the face base (20% black). Because this layer is below all others, it can be drawn as one solid shape without worrying about making it precisely touch the overlapping hair and face areas.
Use Shift-X to switch the stroke color and fill color.
Step 6 – Draw the base shape of the blouse
Create a new layer below the neck base layer.
Using the Pen and Pencil tools (no fill, color stroke), outline the blouse. For the blouse “base” I used a highly contrasting red color and then adjusted it later. Because this layer is below all others, it can be drawn as one solid shape without worrying about making it precisely touch the overlapping hair and neck/chest areas.
The blouse layer illustrates how I excluded the hand holding the beer glass by extending the shoulder.
Use Shift-X to switch the stroke color and fill color.
Step 7 – Draw the dark facial details (100% black)
Switch to Photoshop and adjust the brightness/contrast adjustment layer. Focus on the dark (almost black) eye lashes, eye brows, nostril and edge of mouth. The white areas will correspond to the face base. The yellow areas will become the lighter midtones (lights) and the reddish orange areas will become the darker midtones (mids).
Return to Illustrator and accept the Photoshop reference image changes.
Create a new “face darks” layer above the face base layer and below the hair base layer.
So that you can see the reference image, either turn off visibility to the face base layer or select face base and use Shift-X to switch the stroke and fill colors of that layer. Keep in mind that you will use these same techniques (visibility on/off and switching stroke and fill colors) repeatedly as you work through the remainder of the drawing.
Using the Pen and Pencil tools (no fill, color stroke), draw in shapes that match the dark facial details using 100% black: eye lashes, eye brows, nostril and edge of mouth. Thinking of each area as a shape, instead of the thing it symbolizes (eye, nose, etc.) can help you achieve a better representation of your subject.
Details that extend behind the hair can be roughly drawn in since the extended areas will be covered by the hair layer.
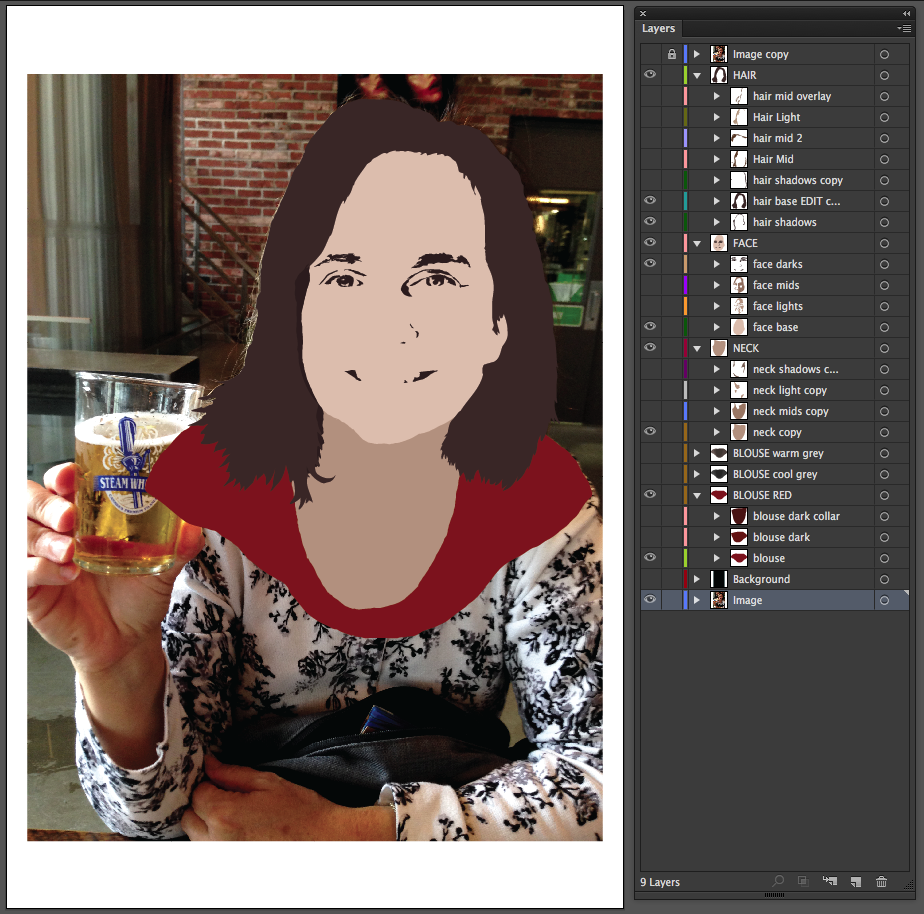
Step 8 – Draw the facial midtones (40% black)
Create a “face mids” layer below the face darks and above the face base.
Using the Pen and Pencil tools (no fill, color stroke), draw in shapes that match the darker facial midtones, represented by orange/red in the reference image. For this face “mids” layer I used 40% black (to contrast with the 20% face base). Mids that extend behind the hair and facial darks can be roughly drawn in since these areas will be covered by the hair layer and face darks layer.
For areas like the jawline, that need to retain a perfectly smooth transition along an edge, draw beyond the edge and later we will return to the area and use the Pathfinder tool > Intersect to cleanly trim that transition.
To create the perfectly smooth transition along the jawline, begin by making a copy of the face base layer. We will use this copy to create the transition.
Select the mids shapes that are overlapping the face base, then hold shift and select the copy of the face base layer.
Open the Pathfinder panel and click Intersect.
The mids shapes will be trimmed to perfectly match the area where it overlaps the face base layer (the areas that do not overlap will disappear). NOTE: The face base layer copy is deleted when Intersect is applied.
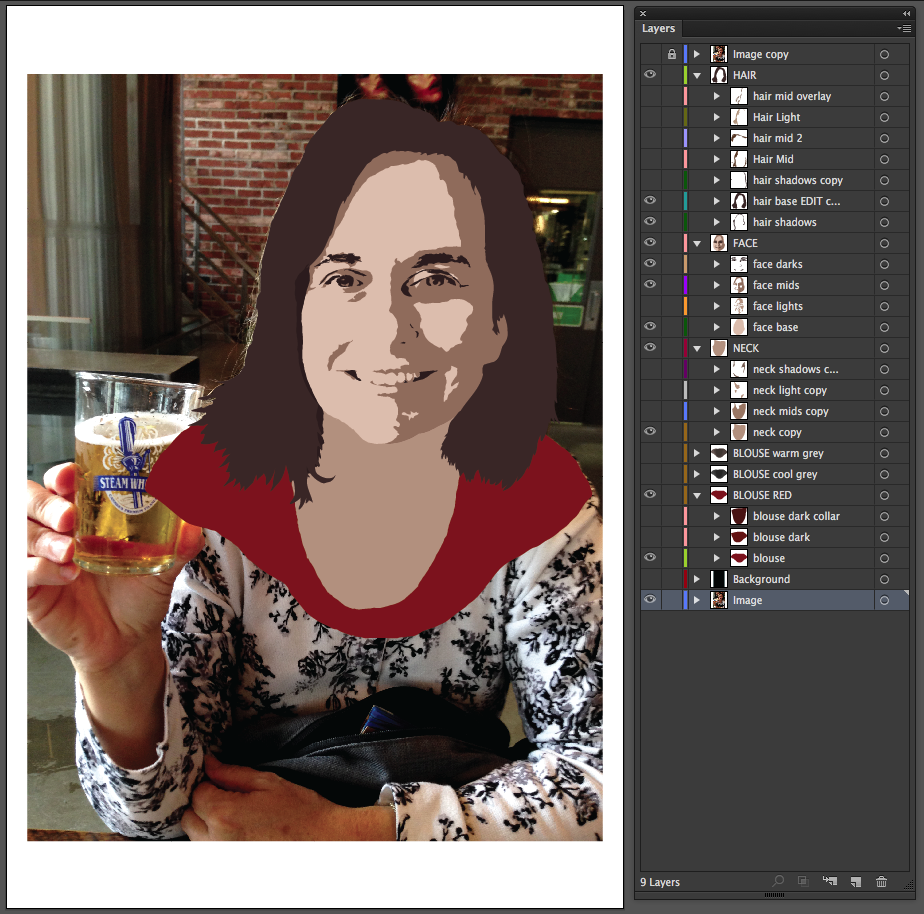
Step 9 – Draw the lighter facial midtones (30% black)
Create a “face lights” layer below the face mids layer and above the face base layer.
Using the Pen and Pencil tools (no fill, color stroke), draw in shapes that match the facial lights, represented by yellow in the reference image. For this face “lights” layer I used 30% black (to contrast with the 40% face mids and 20% face base). Light areas that extend behind the hair, facial darks and facial mids can be roughly drawn in since these areas will be covered by those layers.
To create the perfectly smooth transition along the jawline, begin by making a copy of the face base layer. We will use this copy to create the transition.
Select the lights shapes that are overlapping the face base, then hold shift and select the copy of the face base layer.
Open the Pathfinder panel and click Intersect.
The lights shapes will be trimmed to perfectly match the area where it overlaps the face base layer (the areas that do not overlap will disappear). NOTE: The face base layer copy is deleted when Intersect is applied.
Step 10 – Draw the hair highlights (10% black)
Turn off visibility to the face layers. Switch the hair base layer from fill to stroke only, so that you can see the Photoshop-adjusted reference image.
Create a “hair light” layer above the hair base layer.
Using the Pen and Pencil tools (no fill, color stroke), draw in shapes that match the highlights of the hair, represented by white and yellow in the reference image. For this hair “lights” layer I used 10% black (to contrast with the 80% hair base).
To create smooth transitions along the outside edges of the hair, use the same technique described in steps 8 and 9. Duplicate the hair base layer, then select that base layer and the shapes that overlap the base. Apply Pathfinder > Interset to create the smooth transition.

Step 11 – Draw the hair midtones (50% black)
Create a “hair mid” layer below the hair light layer and above the hair base layer.
Using the Pen and Pencil tools (no fill, color stroke), draw in shapes that match the midtones of the hair, represented by orange/red in the reference image. For this hair “mid” layer I used 50% black (to contrast with the 10% hair lights and 80% hair base).
To create smooth transitions along the outside edges of the hair, use the same technique described in steps 8 and 9. Duplicate the hair base layer, then select that base layer and the shapes that overlap the base. Apply Pathfinder > Interset to create the smooth transition.

Step 12 – Draw the shadows in areas where the hair touches the face (90% black)
Create a “hair shadows” layer above the hair base layer.
Using the Pen and Pencil tools (no fill, color stroke), draw in shapes that match the shadows of the hair. For this hair “shadows” layer I used 90% black.
Step 13 – Add shadows to the neck and chest (80% black)
Create a “neck shadows” layer above the neck base layer.
Using the Pen and Pencil tools (no fill, color stroke), draw in shapes that match the shadows of the neck and chest. For this neck “shadows” layer I used 80% black.
Step 14 – Add midtones to the neck and chest (40% black)
Create a “neck mids” layer below the neck shadows layer and above the neck base layer.
Using the Pen and Pencil tools (no fill, color stroke), draw in shapes that match the midtones of the neck and chest. For this neck “mids” layer I used 40% black.

Step 15 – Add highlights to the neck and chest (30% black)
Create a “neck light” layer below the neck shadows layer and above the neck mids layer.
Using the Pen and Pencil tools (no fill, color stroke), draw in shapes that match the highlights of the neck and chest. For this neck “lights” layer I used 30% black (same as the neck base layer color).
Step 16 – Add dark red to the blouse
Duplicate the blouse base layer and position it so that it is above the blouse base layer.
Fill the duplicate layer with a red darker than the base layer.
Create a new layer, above this dark red layer.
Switch to a different fill color–any color is fine, you’ll be drawing this next object as a disposable guide to cut through the darker red layer. Using the Pen or Pencil tools, draw in a shape (or shapes) that you want to cut through the layer to reveal the lighter blouse base layer below. In this example, I created a triangular shape over the right shoulder (left side of image).
Select the newly drawn shape layer, then hold shift and select the dark red layer below it.
Open the Pathfinder panel and click Minus Front.
The shape layer will be subtracted from the dark red layer, allowing the lighter blouse base layer to show through.
Step 17 – Add a thin collar to the blouse
Duplicate the neck base layer and position it so that it is above the blouse darks layer.
Change the layer color to something even darker than the dark red layer.
With the layer selected, apply Effect > Path > Offset Path… using a 4 pixel offset. This expands the collar, so that it is visible below the neck layers and above the blouse layers.

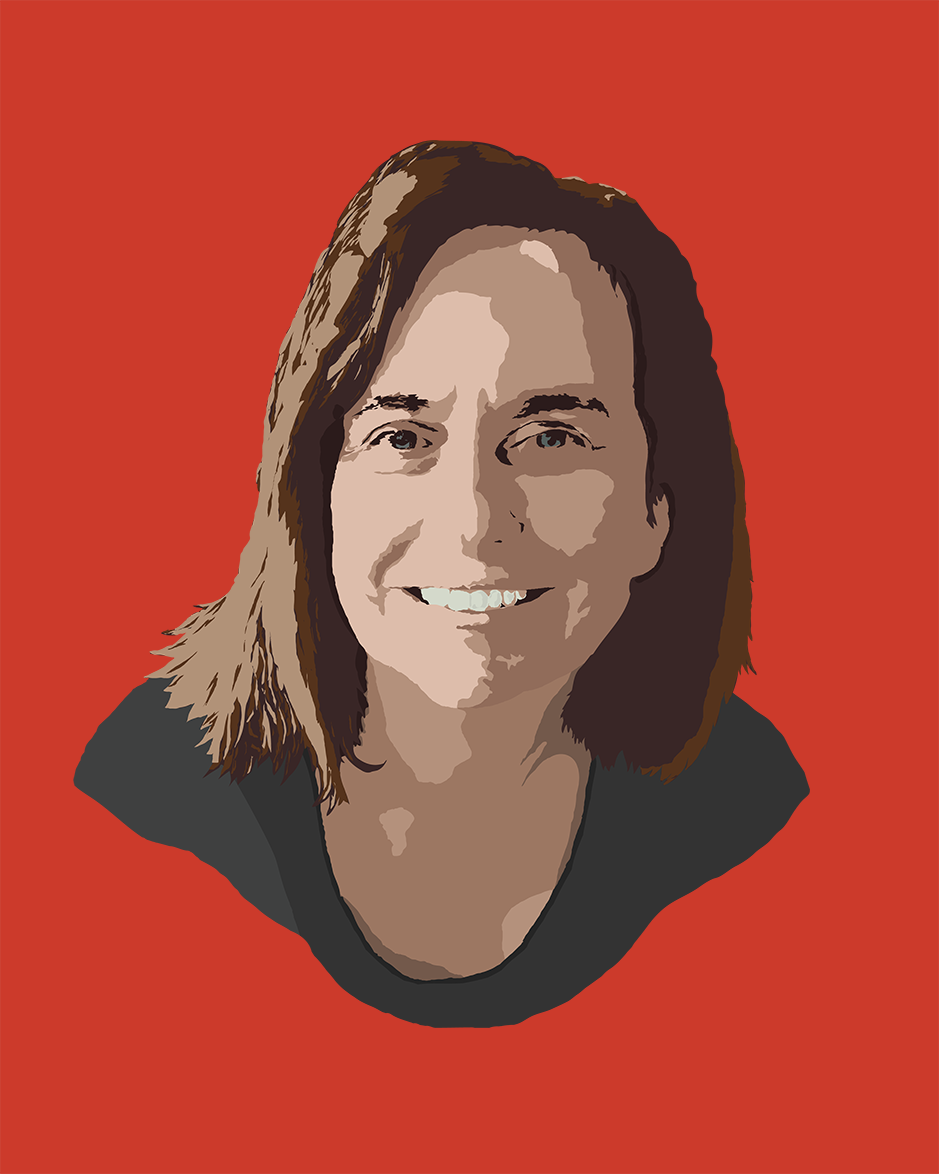
Step 18 – The artwork
Here’s the art, with the photo reference image removed.
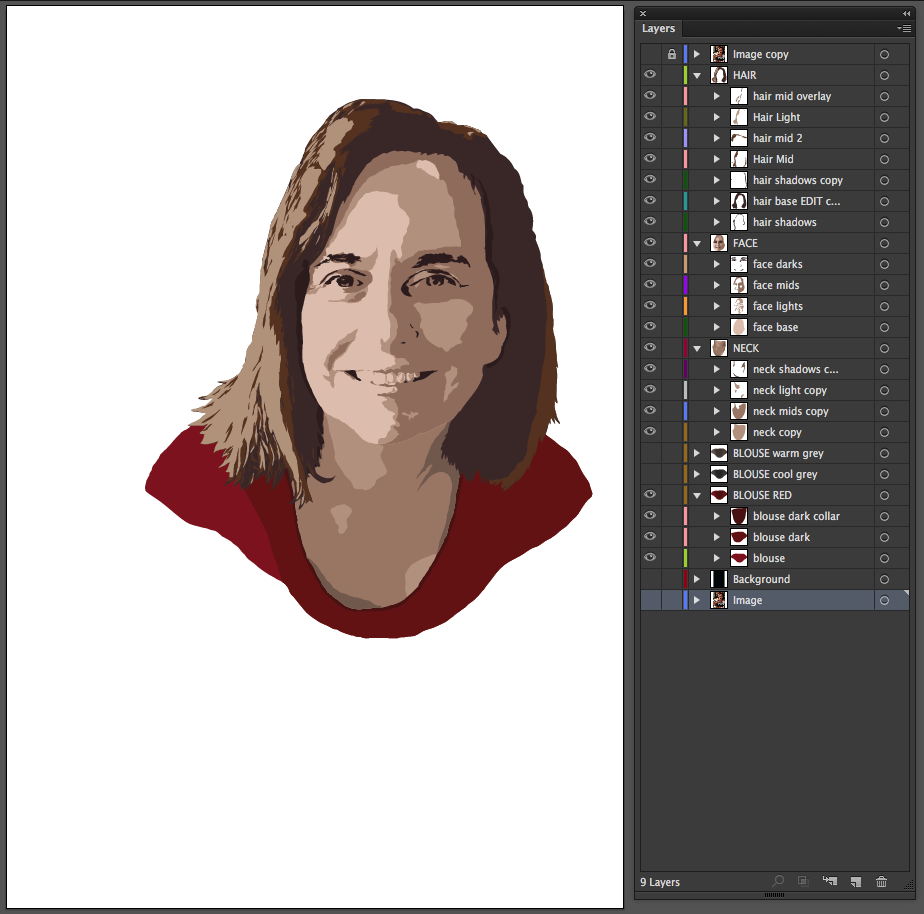
Finished Artwork
After setting the drawing aside for a day, I went on to make further adjustments to the art, by changing the background color, the blouse color and adding contrasting color to the eyes and teeth.

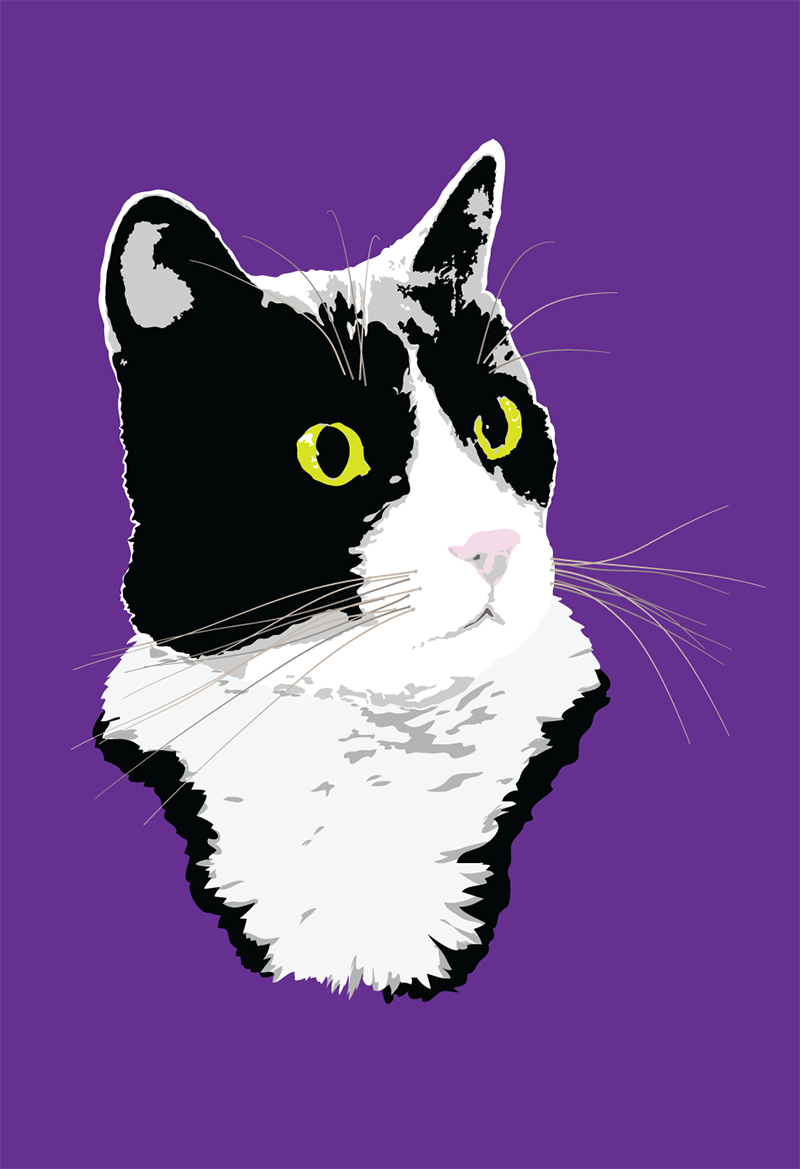
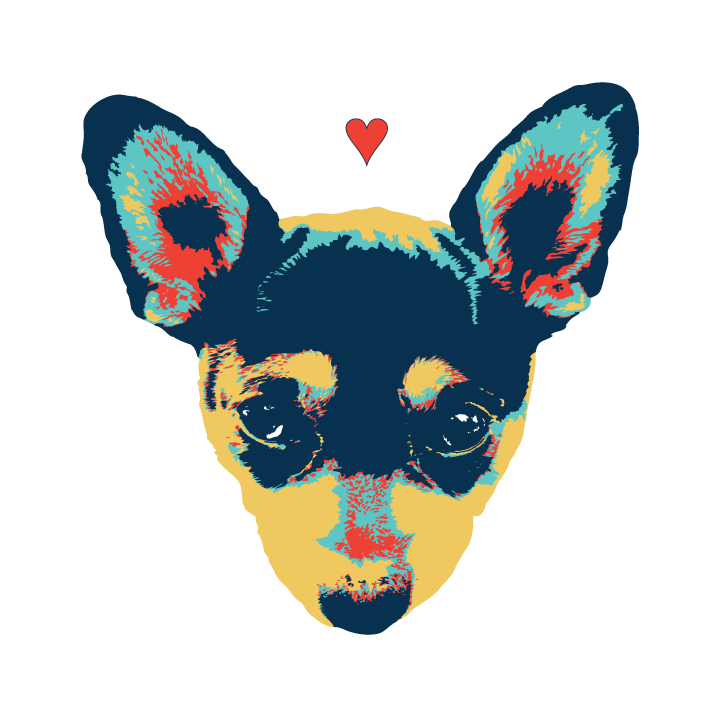
More Vector Portraits
The techniques described in this tutorial can also be used to draw other subjects, like the animals shown below. I hope you use these techniques to have fun with your drawing!

4 thoughts on “How to Create a Vector Portrait with Adobe Illustrator and Photoshop”
Comments are closed.